
Introduction
The Convert Stock Class workflow allows you to mark an exchange or conversion of stock. This workflow can be used to record a single conversion, or to record multiple conversions in bulk.
This workflow requires that you upload evidence of the transaction(s) and will not generate any documentation.
Click the links below to jump to the section of the article:
Record conversions individually
Follow these steps to record stock conversion(s) that occurred outside of Fidelity Private Shares. You will be prompted to upload the related conversion agreement and any required board or stockholder approvals. This workflow will cancel the certificate(s) being converted, and you can choose to either generate a new stock certificate or upload one that was issued outside the platform.
To upload multiple conversions in bulk, or to convert all stock certificates with an associated stock class, follow the instructions below to record conversions in bulk.
Getting Started
To start the workflow, from the company workspace go to Start New Workflow > Equity > Convert Stock Class.
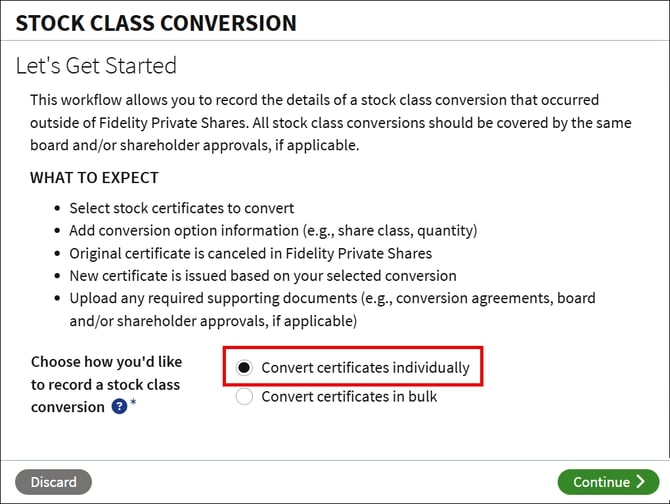
Select Convert certificates individually and click Continue.
Upload Documents
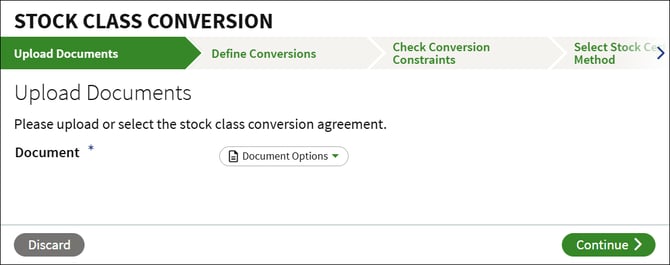
You will need to provide the stock conversion agreement. Click on Document Options to upload the document from your computer or select the file if it has already been uploaded into the Data Room. Once uploaded, you will be prompted to enter the Effective Date of the agreement.
Define Conversions
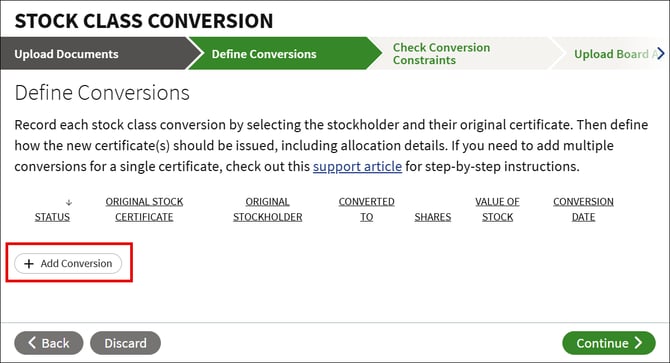
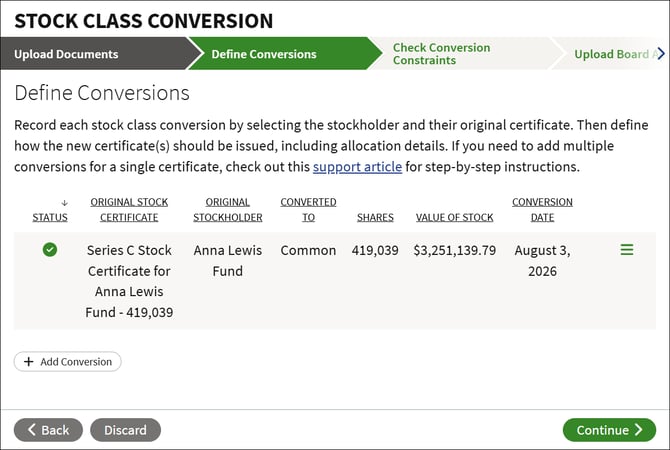
Define each of the transactions included as part of the conversion. This is done by first selecting the certificate being converted, and then defining how the new certificate(s) should be issued.
Typically, stock conversion are performed for the entire certificate. If you need to reflect a partial conversion, you must click Add Conversion again to indicate the number of shares that are not included in the conversion.
- Click Add Conversion.
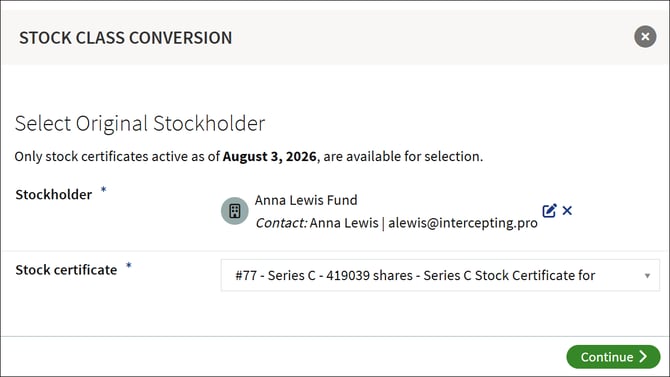
- Select the existing stockholder, select the original certificate, and click Continue. Note that only certificates active as of the effective date selected in the previous step are available.
- Define the details of the conversion, and click Continue.
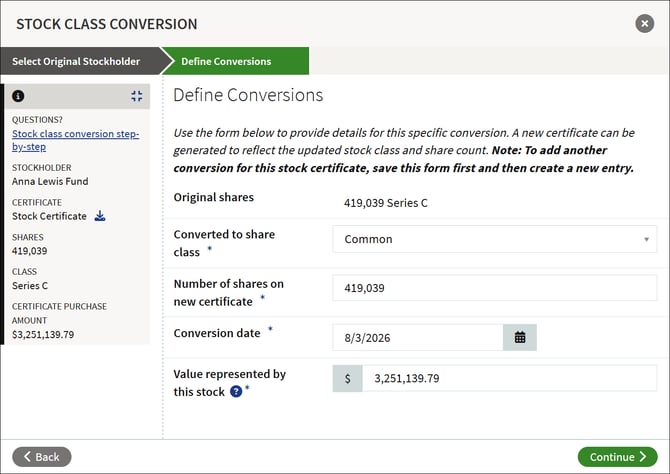
- Converted to share class: select the share class the certificate is converting to.
- Number of shares on new certificate: Enter the number of shares to be issued on the new certificate. By default, the original number of shares will display.
- Conversion date: The date on which the conversion will be recorded. By default, the effective date of the uploaded conversion document will display.
- Value represented by this stock: The total dollar amount which is typically the purchase amount of the original certificate. For certificates with multiple conversions, ensure that the total value across all conversions equals the original certificate purchase amount.
- Click Add Conversion again and repeat the previous steps if you need to add any additional conversion for this certificate, or to record other conversions on the uploaded conversion agreement.
- Click the three-bar menu if you need to edit or remove an added conversion.
- Once all conversions have been added, click Continue.
Check Conversion Constraints
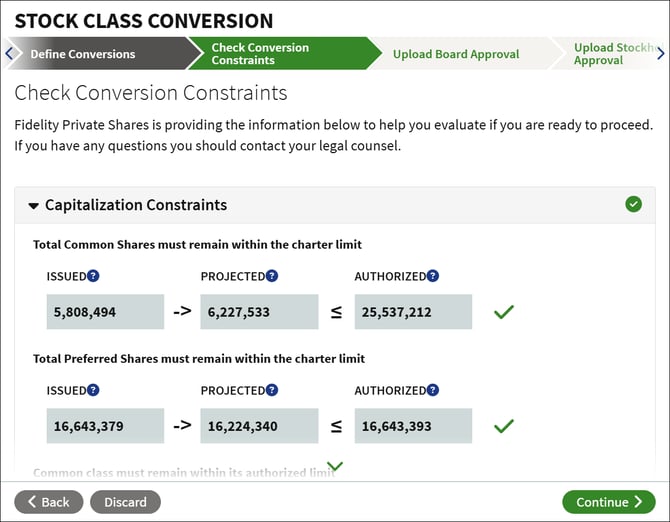
The workflow will check the proposed transaction(s) against the authorized amounts for your share classes. If you have any questions you may want to consult with your legal counsel. Click Continue to proceed.
Upload Board Approval
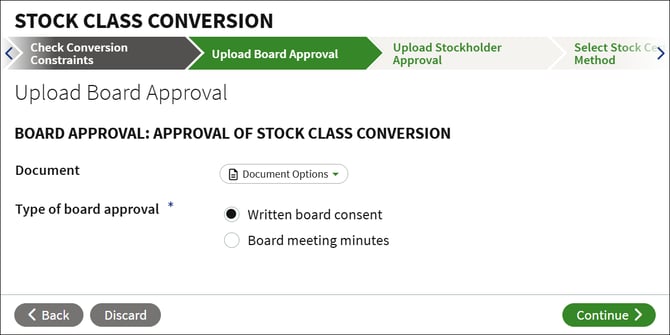
Add the board approval for the conversion. Click Document Options to either upload the approval from your computer, select an existing approval uploaded into the Data Room, select to defer uploading the document to a later time, or if applicable to waive adding the approval.
Select the type of board approval, and enter the effective date. Once added, click Continue.
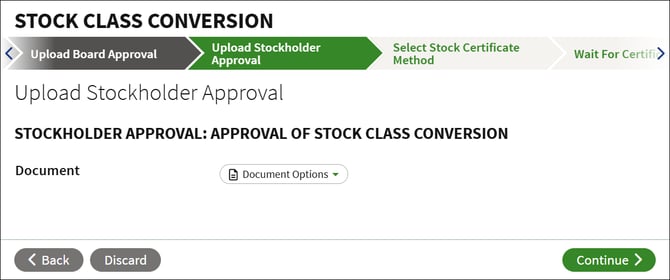
Upload Stockholder Approval
If applicable, add the stockholder approval for the conversion. Click Document Options to either upload the approval from your computer, select an existing approval uploaded into the Data Room, select to defer uploading the document to a later time, or if applicable to waive adding the approval.
Enter the effective date of the approval click Continue.
Select Stock Certificate Method
Select if you want to generate the certificate(s), upload previously issued stock certificate(s), or defer all stock certificate(s), and click Continue.
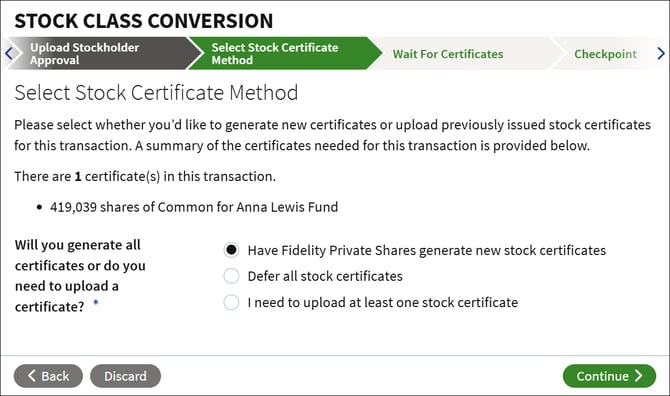
If you select to upload the stock certificate, you can enter the certificate number and add any additional stock legends.
If you choose to defer the certificates, you will need to run the Create Stock Certificates workflow at a later time to create the resulting certificate(s).
Checkpoint
At the Checkpoint, review all uploaded documents and any generated stock certificates. You can send the workflow for legal review or share documents with others before proceeding. Click Continue to proceed. Any required signature requests will be sent, the conversion will be recorded, and all documents will be stored in the Data Room.
Record conversions in bulk
The steps below show you how to record multiple conversions via an uploaded spreadsheet template. This allows you to record multiple conversion transactions, or can be used to convert all certificates associated with a specific stock class. You can upload all related conversion agreements, however, all transactions must be part of the same board/stockholder approval.
To record an individual stock conversion, follow the steps above to record conversions individually.
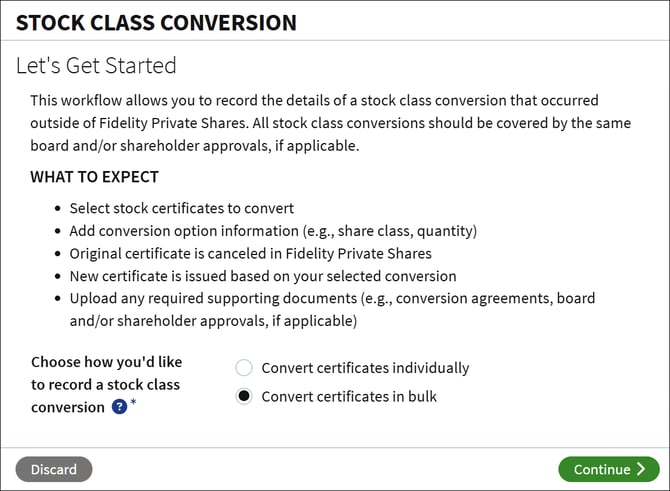
Getting Started
To start the workflow, from the company workspace go to Start New Workflow > Equity > Convert Stock Class.
Select Convert certificates in bulk and click Continue.
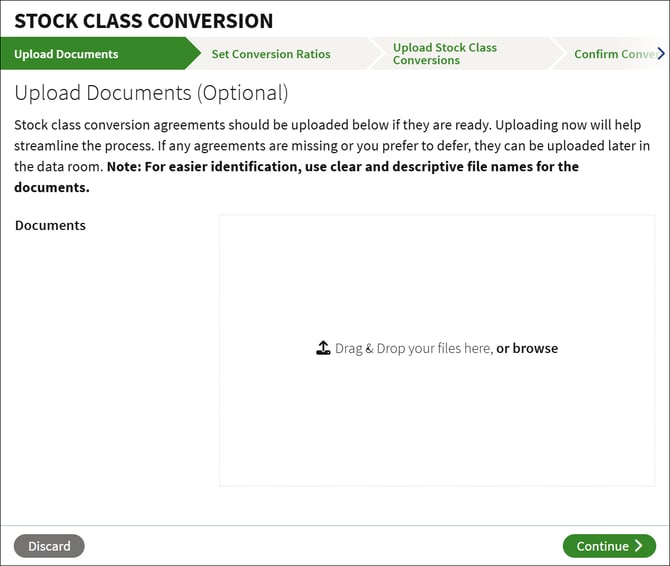
Upload Documents (optional)
The conversion agreements can be uploaded here. Either drag and drop the files into the box, or click on browse and select the files from your computer. Any missing or deferred documents can be added later in the Data Room. If any documents are not connected to a conversion, they will not be uploaded into the Data Room.
Once all documents have been added, click Continue.
For easier identification later in the workflow it is recommended to use clear and descriptive file names for the documents.
Set Conversion Ratios (optional)
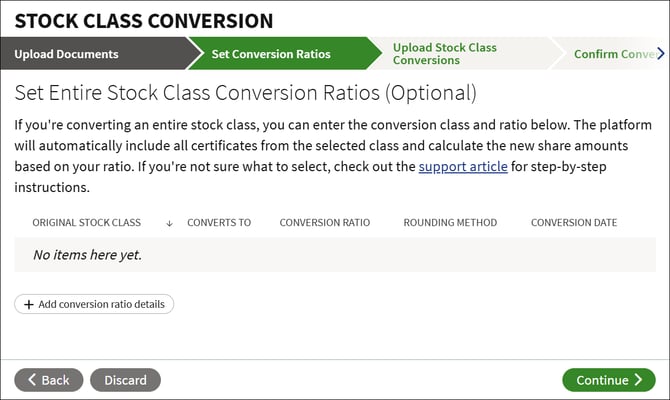
Use this step to convert all certificates in a stock class at once. Select the conversion class and details of the conversion, and the system will automatically calculate the conversions and prepopulate the spreadsheet template. To skip this step, click Continue.
-
Click Add conversion ratio details.
-
Add the conversion ratio details:
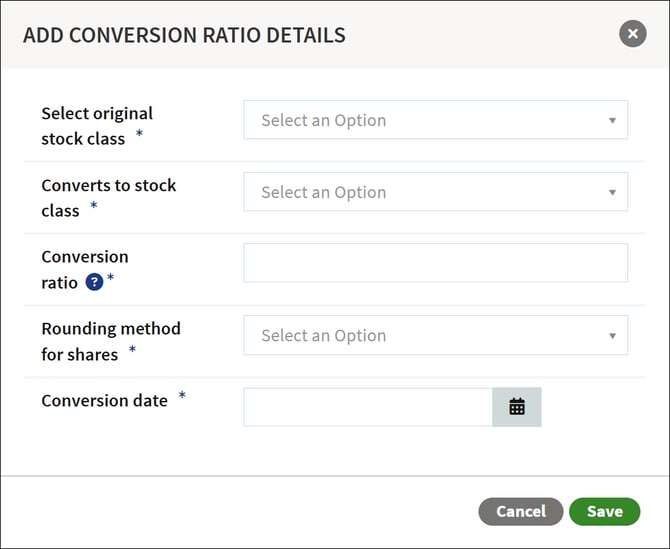
- Select original stock class: the stock class being converted
- Converts to stock class: the stock class to which all certificates will be converted.
- Conversion ratio: Enter the conversion ratio in decimal form. For example, a 1:1 conversion would be entered as 1, a 2:1 conversion would be entered as 0.5.
- Rounding method for shares: if using a conversion ratio, select to round shares to the closest whole number, round all shares up, or round all shares down.
- Conversion date: enter the effective date of the stock conversion.
- Click Save.
- Repeat these steps for any additional stock classes.
- Click Continue.
Upload Stock Class Conversions
The details of all conversions are added and uploaded through the provided spreadsheet template. Click Download Spreadsheet and open the template.
The template is divided into five tabs
-
Instructions: information and instructions on using the spreadsheet template.
-
Stock Class Conversion Details: This will show the details of the full stock class conversion if added in the previous step. This tab is not editable.
-
Conversion Details: the list of all conversion transactions. If a full stock class conversion was selected in the previous step, all certificates of that stock class will be populated on this tab.
-
Stock Certificates: a read-only list of all stock certificates on the cap table.
-
Documents: A read-only list of all documents uploaded previously in the workflow.
Adding a conversion
Conversions are recorded on the Conversion Details tab of the spreadsheet template. Fill out the required columns, and repeat until all conversions have been added.
If any full stock class conversions were added in the previous step of the workflow, all certificates will be listed, and you can make changes to any individual conversion as needed.
-
In the next available row, select the stock certificate from the drop-down menu in the Stock Certificate column. The Stockholder, Original Stock Class, and Original Number of Shares columns will populate based on the selected certificate.
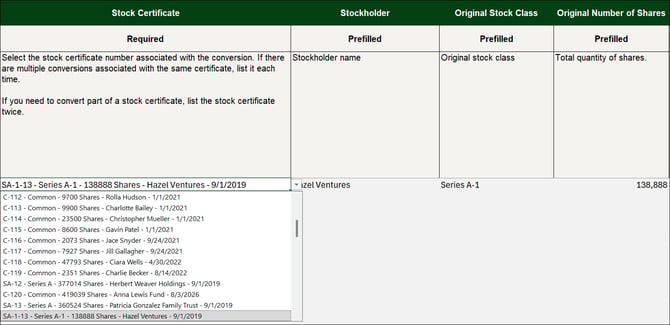
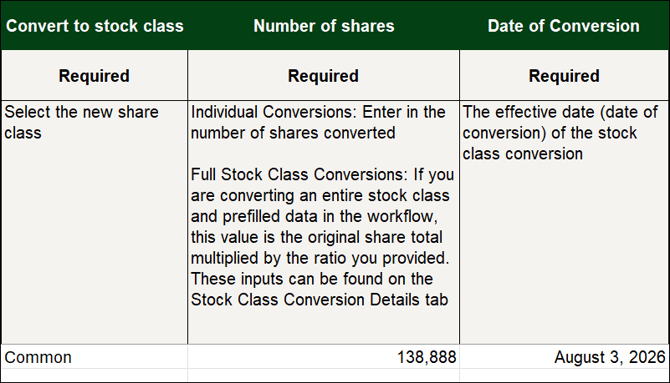
- Select the destination share class in the Convert to stock class column, enter the Number of shares, and enter the Date of Conversion. If you selected a full share class conversion, the Number of shares column will be prefilled based on the conversion ratio entered previously.
- Enter the Value Represented by Converted Stock, if different from the amount in the Value Represented by Original Stock column. Typically these amounts will match; for certificates with multiple conversions, ensure that the total value across all conversions equals the original certificate purchase amount.
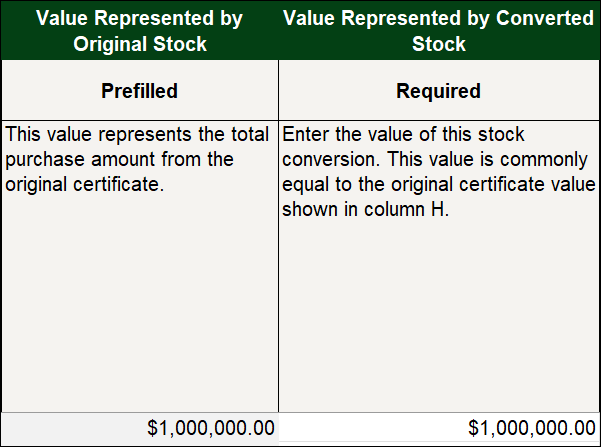
- If you uploaded any conversion agreements, select the applicable agreement from the Document Agreement drop-down menu. Only selected documents will be added to the Data Room.
- Repeat these steps until all conversions have been added.
- Save the spreadsheet template.
Uploading the completed spreadsheet.
Click on Chose a file and select the spreadsheet template from your computer, and click Continue.
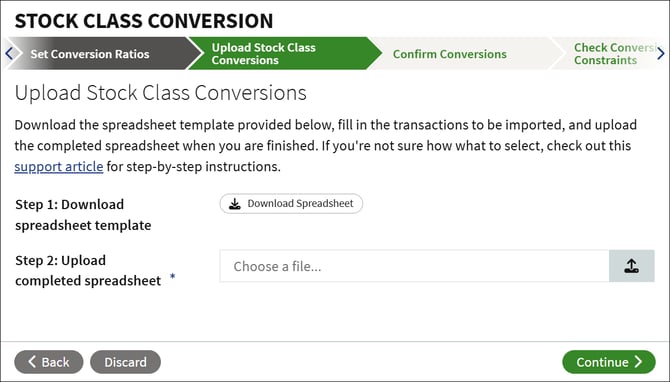
Resolve Upload Errors
If there are any missing, unexpected, or incorrectly formatted values, you'll be prompted to fix those errors. Click Download Spreadsheet to download the template with the errors highlighted in red.
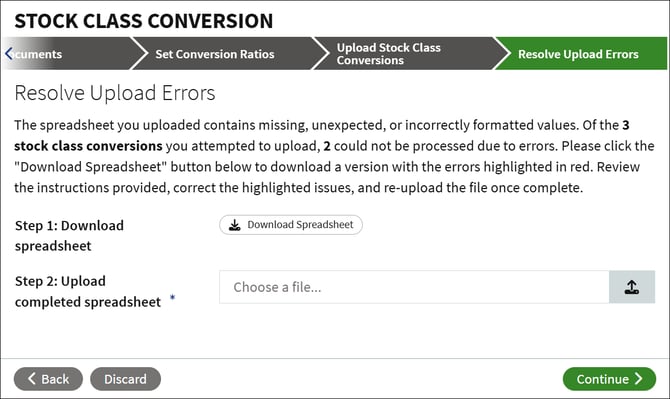
Errors will be highlighted in red with a note explaining what needs to be fixed.
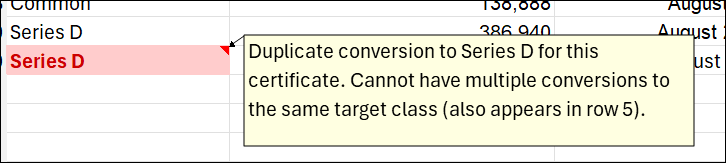
Once all errors have been resolved, save the spreadsheet template and repeat the previous steps to upload the template.
Confirm Conversions
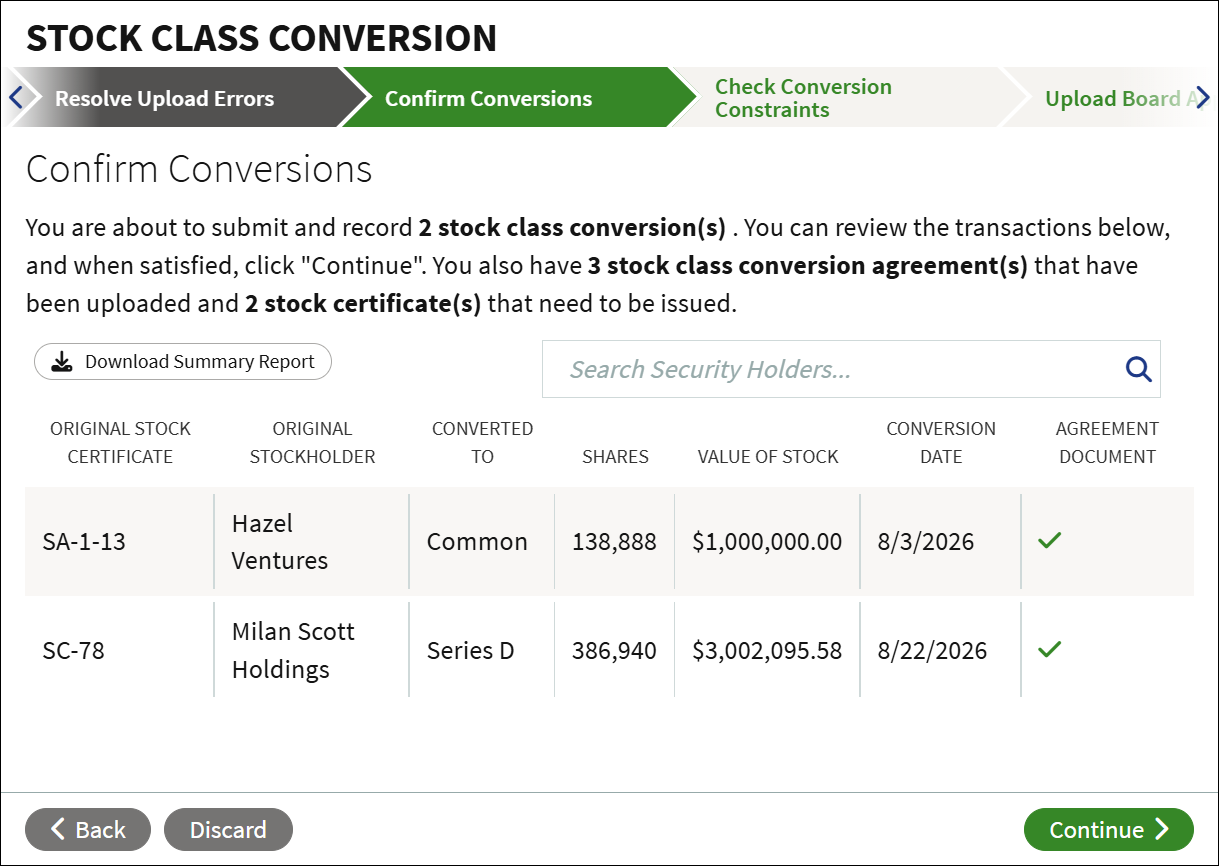
When the template has been successfully imported, you will see a summary of all conversions. You can also download a summary report by clicking Download Summary Report .Once reviewed, click Continue.
Check Conversion Constraints
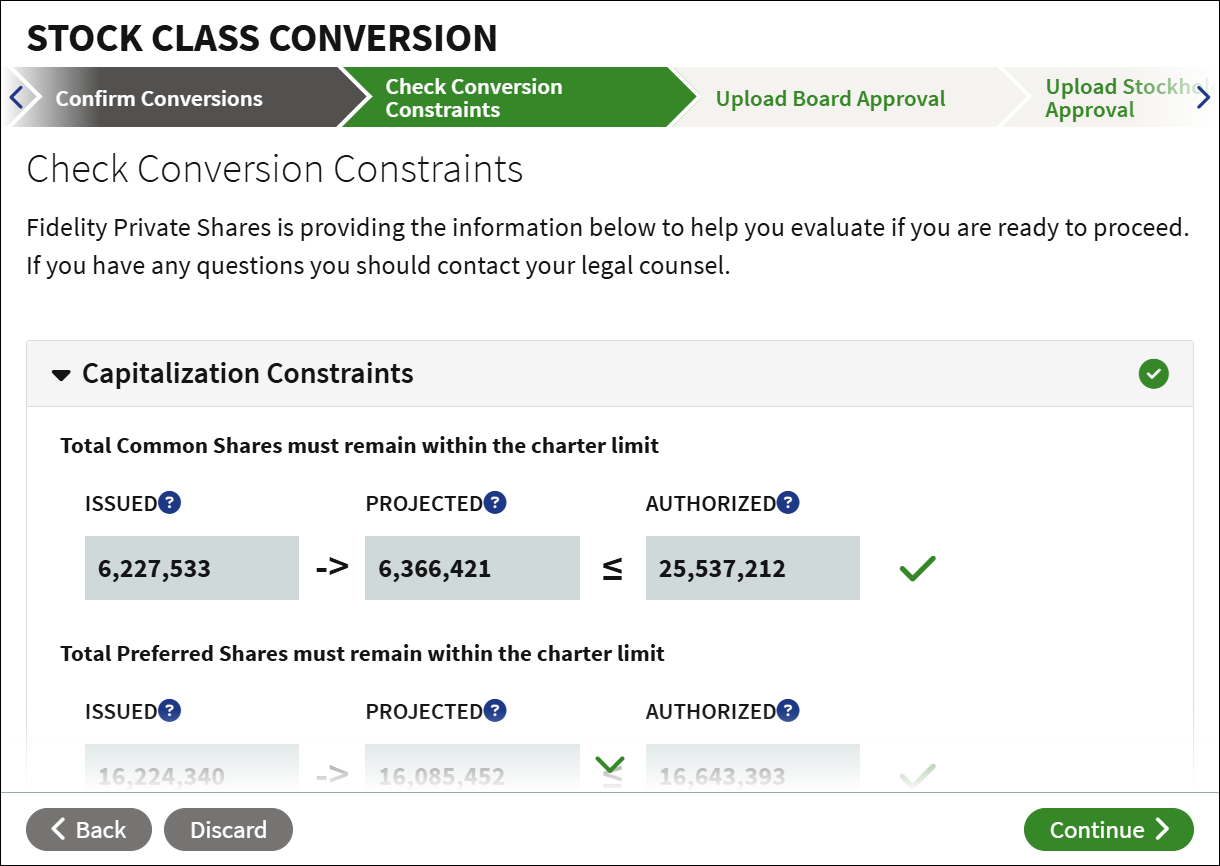
The workflow will check the proposed transaction(s) against the authorized amounts for your share classes. If you have any questions you may want to consult with your legal counsel. Click Continue to proceed.
Upload Board Approval
Add the board approval for the conversions. Click Document Options to either upload the approval from your computer, select an existing approval uploaded into the Data Room, select to defer uploading the document to a later time, or if applicable to waive adding the approval.
Select the type of board approval, and enter the effective date. Once added, click Continue.
Upload Stockholder Approval
If applicable, add the stockholder approval for the conversion. Click Document Options to either upload the approval from your computer, select an existing approval uploaded into the Data Room, select to defer uploading the document to a later time, or if applicable to waive adding the approval.
Enter the effective date of the approval click Continue.
Select Stock Certificate Method
Select if you want to generate the certificates, upload previously issued stock certificates, or defer all stock certificates, and click Continue.
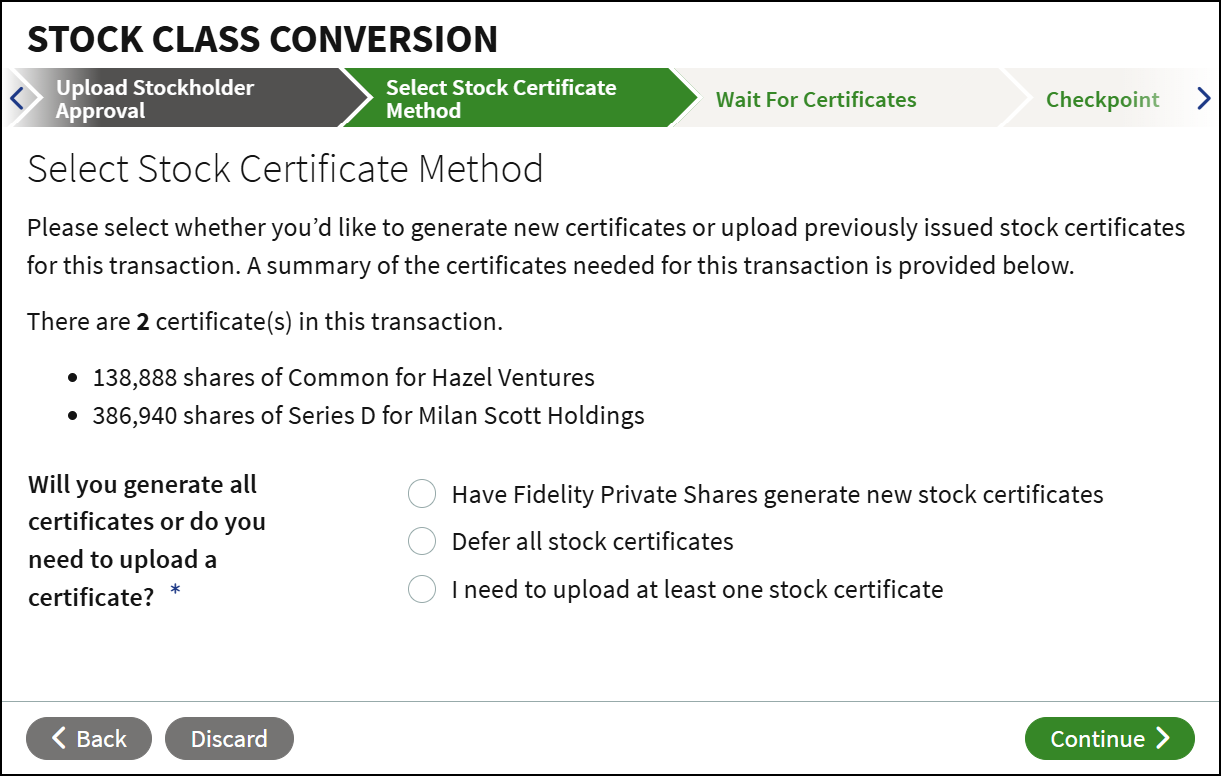
If you select to upload the stock certificate, you can enter the certificate number and add any additional stock legends.
If you choose to defer the certificates, you will need to run the Create Stock Certificates workflow at a later time to create the resulting certificates.
Checkpoint
At the Checkpoint, review all uploaded documents and any generated stock certificates. You can send the workflow for legal review or share documents with others before proceeding. Click Continue to proceed. Any required signature requests will be sent, the conversions will be recorded, and all documents will be stored in the Data Room.
FAQs
[accordion: Can a pending certificate (e.g., still needs to be signed) be selected for conversion?]
No, only active certificates can be selected. [/accordion]
[accordion: Can I generate the stock conversion agreements as part of the workflow?] Currently this is an upload-only workflow; conversion agreements and board/stockholder approvals need to be generated and executed outside of Fidelity Private Shares. [/accordion]
[accordion: What if a certificate is missing an original purchase price per share?] The workflow will flag an error if a certificate that is being converted has no original price paid per share. This needs to be resolved outside of the workflow; please reach out to our Support team for further assistance in making changes to existing stock certificates. [/accordion]
[accordion: Can I process a stock transfer or secondary sale as part of this workflow?] No, this workflow will only process the stock class conversion. See this article for more information on recording stock transfers and recording secondary sales. [/accordion]
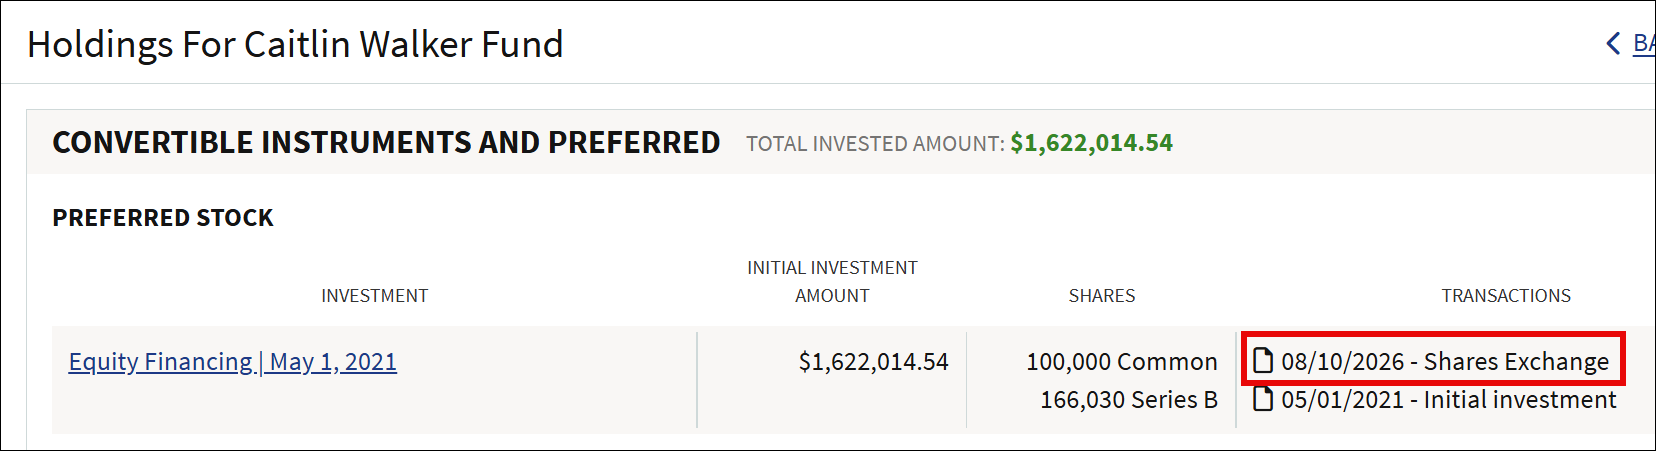
[accordion: What will the conversion transaction look like in the Cap Table or other reports?] When looking at the holdings page for a stockholder, the conversion will show in the Transaction section as a Shares Exchange with the effective date.
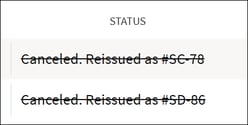
In the Stock Ledger, the original certificate will show in the Status column as Cancelled. Reissued as [Certificate Number] as in this example:
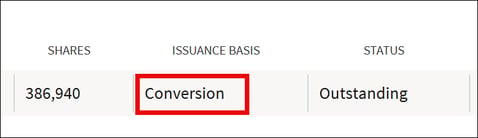
The new certificate will show Conversion in the Issuance Basis column, as in this example:
 [/accordion]
[accordion: Can one stock certificate convert into more than one share class?] Yes, but you will need to define all transactions, and the total shares of all conversions must match the original certificate.
If running the workflow for individual conversions, on the Define Conversions step, define the first partial conversion. Click Add Conversion again to define the next partial conversions until all have been added.
If using the bulk conversion template, add the same certificate on additional lines on the Conversion Details tab to capture all conversions. [/accordion]
[accordion: Can I record a partial conversion?]
Yes, but you will need to add a second conversion to show the balance remaining going to a new certificate in the same share class. When adding the conversion for the balance remaining, select the same share class as the original certificate.
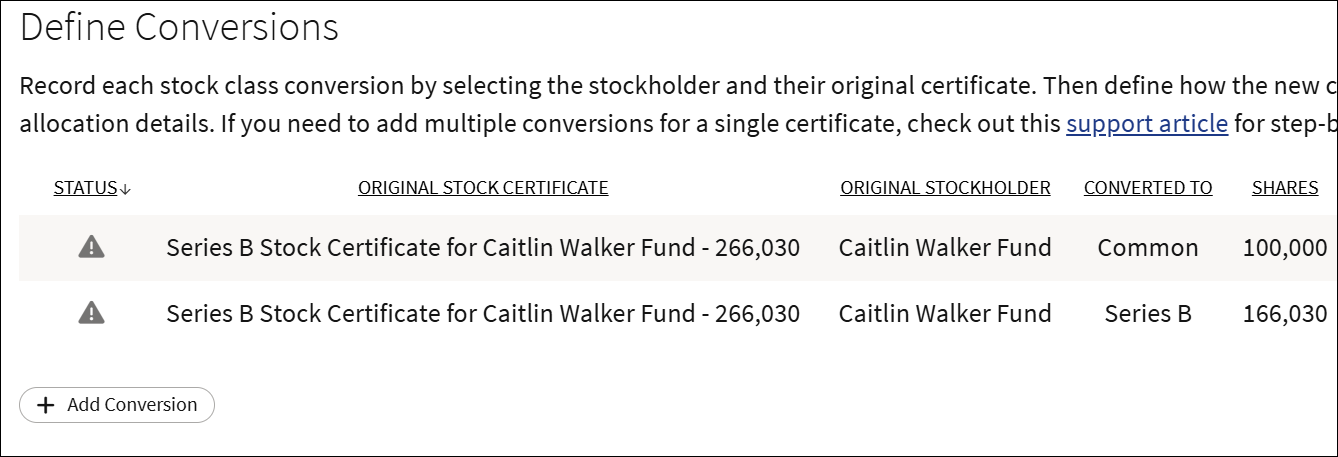
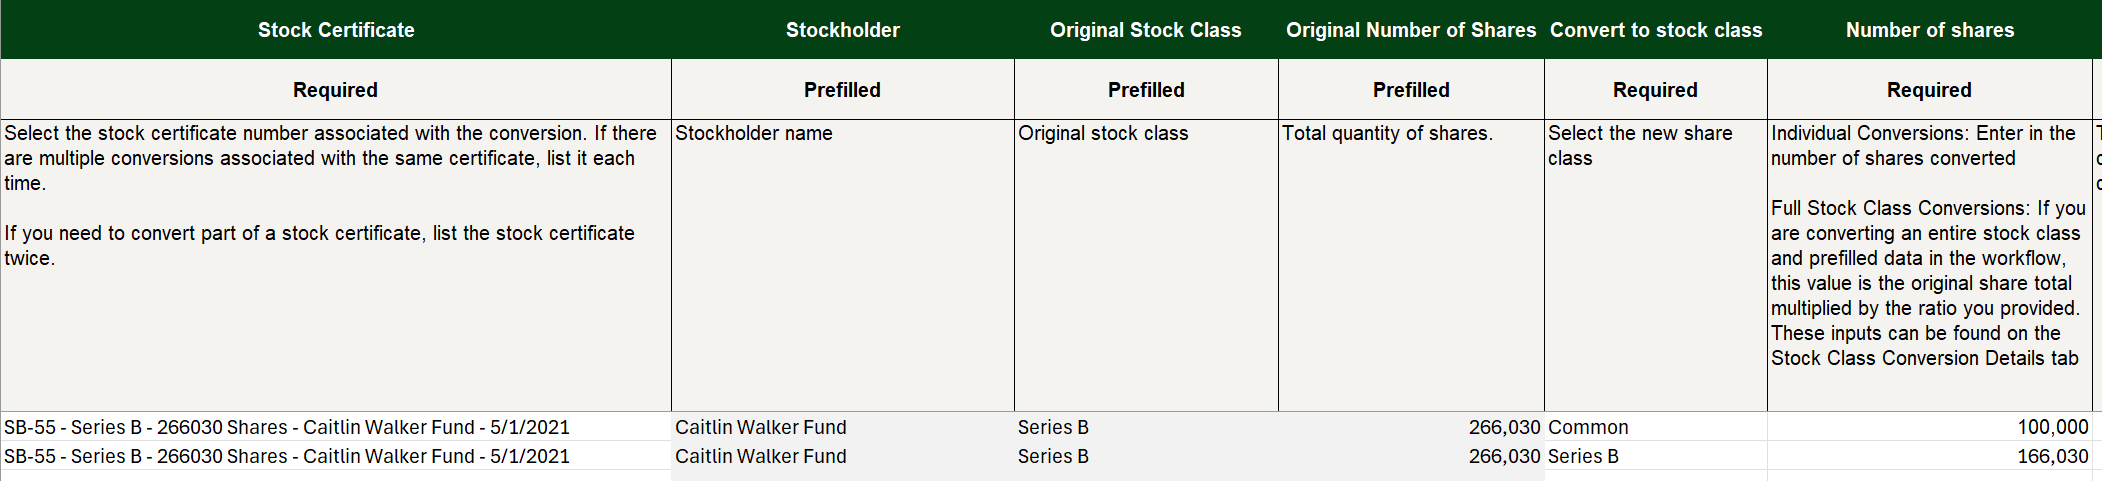
Below is an example when running the workflow individually where 100,000 of Series B shares are converting, and the balance remaining of 166,030 shares will be issued into a new Series B certificate for the holder.
Below is the same example when using the bulk template option of the workflow:
[/accordion]
Screenshots are for illustrative purposes only.
Fidelity does not provide legal or tax advice. The information herein is general in nature and should not be considered legal or tax advice. Consult an attorney or tax professional regarding your specific situation.
Fidelity Private Shares LLC provides cap table management and other administrative services to private companies and their equity compensation plans.
Fidelity Private Shares LLC
© 2026 FMR LLC. All rights reserved.
1090609.4.0